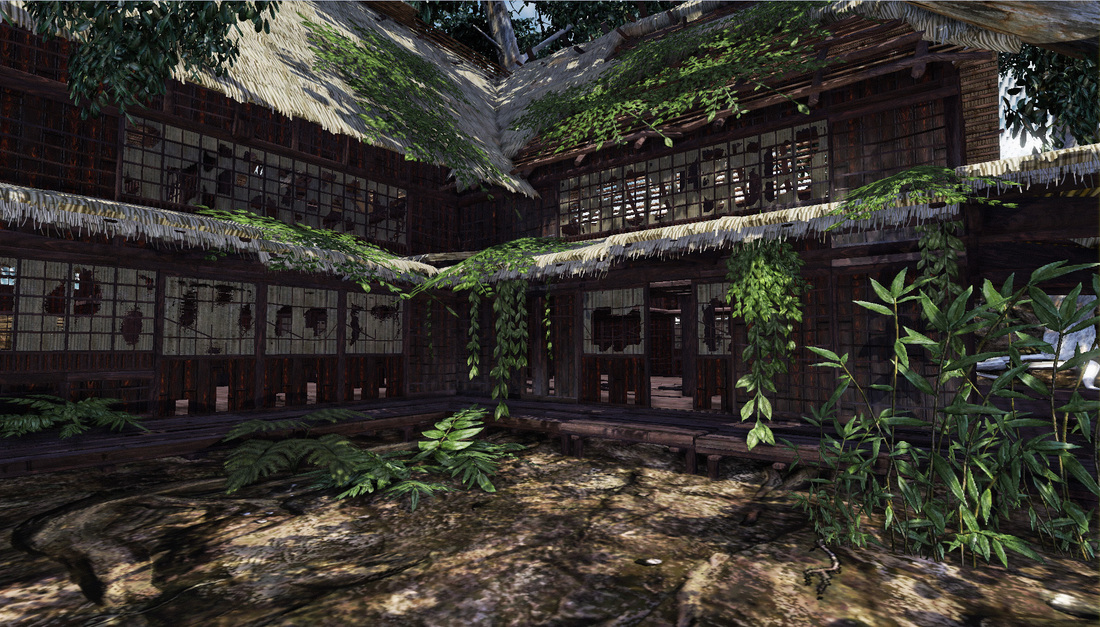
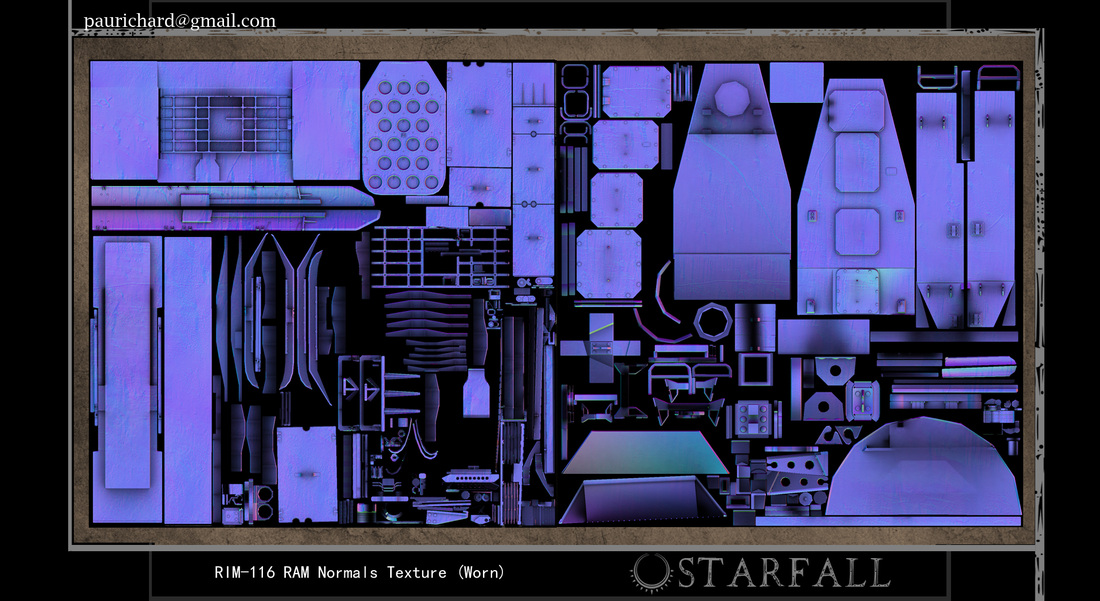
In this update, I wanted to share with you some of my thought process when I design textures. All the work shown below is in work in progress. (I haven't gotten around to show/finishing diffuse, specular, and height maps) Often enough, many students create a 1:1 ratio of one asset, one texture. This isn't necessary a bad thing because the asset may require a unique shader material. However it is possible to create a few textures that could build you a level. The goal is to create one texture that could build several objects in a game. Above are some examples of how a well planned, tiling texture could build multiple objects (even broken versions) and allows your game to free up more precious memory. A simple example is my fence texture which includes damage ends allow me to create broken versions of itself. Lastly, we can always have an object reference multiple textures. Although it is an option, keep in mind your telling the game engine to make an extra draw call for the "x" amount of textures your object is referencing. The bridge shown above is making one texture call. I can also build broken rail pieces on the fly using the same texture. Creating the User Interface for "In Ruins" As with any small team, there's never a dull moment. As we get closer to completion, our priorities have to shift. Most games contain some kind of UI and I was assigned the task to get the look knocked out. Below are some of the UI I've been working on. We wanted our UI to have a strong silhouette, be easy to read and yet be subtle so the player can focus on the game and not be drawn out of their experience.
0 Comments
I wanted to share with everyone some well deserved updates. I've been planning out UV layouts, unwrapping and texturing the concept scene. Here are some highlights on my progress:
I've been working on a side project that is based off a Darksiders concept art. I wanted to share with you my current progress. I've started about a month ago with most of the model work nailed out. I'm currently working on the textures for the scene while still involved with my team's "In Ruins" game.
I'll be trying to update our bigger progresses monthly on my blog. I'll be working on the large structures of the map and post these updates here on my blog. I've been busy with learning new material as well as other things. This bridge consists of a single tiling texture to make. I plan to create all the color maps all together once I get all the textures/models planned/created.
The team and I have been shifting focus on multiplayer map design for In Ruins. Below are shots of block outs done by our level designer Danny Quesada. The team has been testing the level for a few months before I started to art out the level. I've taken some the time to plan and layout meshes and textures. I'm trying to develop the look and feel of the main building with this first art pass. Once I add a thatched roof to the house, I'll be going over the second pass. I'll break up the modularity further by adding broken/worn pieces and other assets for cover. Once I establish most of the level I will follow up with the diffuse maps at the next pass. The roof will be a bit tricky to build. I'll have to build in function while satisfying roof art and architect. The roof may end up being a unique asset over time. (trial and error) I'll try to update every month of the project's progress. During the earliest stages of In Ruins, the team and I focused on our specialized aspects. On our earliest approach, we wanted to have Japanese architecture be our influence. We also wanted to have the vegetation over run the complex. These early shots were showcasing some ideas we had and the team and I were trying different techniques to achieve a stylized reality. In Ruins has gone through several level layouts and game mechanic changes. The art has also gone through some changes. One thing to take note was changing diffuse maps. The UDK engine renders color maps better when you make your darks lighter. The lighting system in UDK tends to light shadows heavily so when your diffuse maps have a "pasty white" look to them, they tend to get more "texture definition."
Starfall was at its final stages of production when I joined the team. I was quite green at the time, learning a pipeline and the game engine. During those 3 months, I was learning low poly modeling expectations, unwrapping techniques, basics of texturing maps, implementing assets and navigating around the game engine. What I learned about being "new" to a team/environment is to have the right mindset. When your new to a job, you need to satisfy a few simple objectives: - get up to speed with your role - get to know your team and work well with them - find ways to help/provide for the team The quickest way to fill that hole is to ask tons of questions. Unless you can read minds or have exceptional perceptive skills, (Sherlock Holmes?) you need to know what and how to complete your tasks your team/lead asks of you. Once you get better at asking thorough questions, your work will be quick and efficient. Asking questions also shows how much you care about the work and the team. Remember, questions can also relate to what your co-worker maybe working on. You're showing interest in what they're doing and you can share tips, tricks and ideas. If you're a lead/veteran, you should be proactive about the new guy in town. He/she could be a team member you can count on (helping your work load or improving overall efficiency of team) or the one who causes more problems for you. There should be incentive to help them get up to speed. Maybe the new guy can show you new tricks or provide solutions. If you help them settle in quicker, the better they can help you and your team.
During the last few weeks of crunch, I volunteered to stay the nights to help the team finish the game. While I was cleaning up artwork/touching up the last details, my leads taught me many details of the trade. But the most I got out of the experience was the trust and bond we shared. Everyone was doing whatever they can to create the best game we could possibly make. Exodus was my first project as a lead artist. I came across a lot of trial and error on this project. I'd like to emphasis how important it is to have a solid structure in a development team. If you want to start working on a big triple A title, make sure you have the right people in the right places. The core group of any team will require the following: -programmers -game designers -tech artists -artists (general but also very complex department) What makes a game are programmers and designers. Games are defined by how fun, challenging and rewarding they are to a player. When your buttons don't work, the game freezes or glitches, programmers take the heat. When the game feels unfair, the puzzles don't feel intuitive and/or the fun factor is out the window, the designers take the blame. If your game can function with spheres/boxes and the game mechanics are fun and rewarding, you have yourself a successful title. The art department is the vision and can be a big part of selling a game. (game mechanics can sell like having multi-player feature or is a genre like rpg, first person shooter, etc.) Before you pick up artists, you need to have the tech artists who can troubleshoot, problem solve and even develop tools to ease the work load of the artists. You also need to have an art lead who is familiar with your pipeline (or generate one ALL of your leads know/work with) and has the know how to teach, problem solve and develop your artists to be thinkers and problem solvers themselves. The art department also has a lot of specialized areas that can be tailored to the game you're creating. Most games require having an animation department. They can cover rigging and sophisticated to traditional animation techniques. If your game doesn't require such dedicated department, learning basic rig and animation skills can still get you through making a game. Concept art, special effects, cinematic and lighting departments aren't required unless you have the budget or make up a core feature in your game. (most triple A titles will probably have such dedication to these departments) Again not every specialized field is listed because it depends on the nature of the game that's being developed. Get your game mechanics working When the leads were informed of what game play mechanics would be in the game, we designed the level layouts and themes around them. My level designer and I were assigned on a dam level. My designer had plans of using a grappling hook mechanic to traverse through our level. After 3 months left in our production cycle, our programmers weren't able to get any hook feature into the game. That cost my team and I to remove the level out of the entire game after 6 months of work. We disbanded our team to help other teams fix, redesign and build their levels. I had to build half the level for the "Bridge Team" because they also had made plans relying on the grappling hook mechanic. Have a dedicated art director All the teams were structured by the 6 levels we wanted in Exodus. We also had a concept and program department who would operate in isolation. During our early stages of pre-production, we lost our art director. That created a void between all the teams. Every team had a way of creating assets, textures and packages. We started to have duplicate assets because each team had a barrel, a barricade, etc. We needed an art director who could have solidified a workflow and pipeline. The director would be keeping an open communication of what each level was doing. The teams became inefficient and lacked team chemistry with one another. My time on Exodus During my time on Exodus, I had a lot to learn. Our project lead divided up the levels and my level designer and I were assigned on the power plant level. After several weeks of designing puzzles, level layouts, creating an asset list and assigning them to my artists, our level was changed to the Dam level. Looking back on this incident I realize several things could of been done. First is having a project lead who stuck with the plan. When changing something drastic as a level or game play mechanic, it effects your team. As a lead I may have a tough skin about such changes but I had a lot of explaining to do when my artists spent hours working on an asset. At the time I did not have enough knowledge on shaders and materials in UDK. What I could of done was train my staff how to do tilable textures that could be easily changed and transferable to such changes. During the time I was working on the dam, I asked around the leads to find a solution on how to make the dam not so tilable. (no one had a real answer at the time and after Exodus, I was able to find a solution) After the level switch, the team settled down and spent a lot of time learning (we had a group of artists that were fairly new to the basics) and getting everyone up to speed. I ran into a lot of issues with textures not holding up, models that were too high poly or to sophisticated for the level designer to be used in a modular way. When news came through about not having the grappling hook, we had to scrap our level after 6 months of production.
Although I had the mindset of doing what is best for the project, I can imagine the feelings my team had against me or the project management itself. For the greater good I had my team split up and help the other teams finish their levels. My designer went off to help with the programmers who were behind and I got picked up by the Bridge Team. The bridge level was on its way but they had one big issue for their beginning half of the level. It was relying on the grappling hook mechanic and my level designer was still handling the boss battle gameplay. I took up level building for the first half of the level. In 2 weeks time we had a rough of the first section of the level. In the end, my original team had been able to help wrap up the project. With all the trial and error, I was able to change things around on my next project, Freeze-E Frosty's. Creating panorama pictures do not have to be limited to your camera settings. There is a feature called photo merge that has been around since CS4. This feature will automatically stitch images to form your desired panorama. Before I dive into the panorama feature, I'd like to discuss about some simple rules you should follow when you take pictures for photo merge. Decide on what kind of photo you are taking. If you are taking pictures at a point of origin, your images will create an ellipse effect. If you want to create a image based upon the earth's horizon line, you'll need to shift your point of origin as you take your pictures. When you take pictures, have them overlap each other. This way photoshop will have room to work with when it stitches your photos together. When you are in photoshop, click on your "File" tab and look for "Automate." Once you hoover over "Automate," select "Photomerge." A new window will pop up and it will be asking you to select which images you'd like to piece together. Simply click on "browse" and select your images. You can also select several formats on how you want your images to be pieced. There will be some trial and error until you get the look you're looking for. Here are some examples of my results with this feature:
A logo can be a word, an icon or symbol. The word can be the name of your product. (example Samsung, Adidas, etc.) . An icon is a image depicting an object such as a fish, shoe, car, and so on. A symbol is sign that has a universal meaning like the cross or a Caduceus. A logo should hold meaning and value. Do you want your logo to showcase power and masculinity? Maybe you want it to mean integrity? What you should do is create a list of verbs that help describe your logo. We should go into design principles when we are creating a logo. My number one rule is establishing "visual communication." That must be king in your design. Good logos are clear and simple. Icons are easy to read, understand and relate. Choosing an "Arial" font is also to read while "Roman Times" causes the audience to squint their eyes. Spacing is also key in logo design. Sometimes filling every empty space is a bad idea and that having a gap of space is what you need. To summon things up, a good designed logo is clear, easy to read and understand. The first thing we should design is the name. Every logo has a name. Nike had to establish their name before the audience can relate their "swoosh" logo. That applies to many logos such as AT&T, McDonalds, etc. Choosing a font requires understanding of typography. The 4 things to know about typography are serifs, san serifs, tracking and kerning. Serifs are all the arches, ends and nick nacks found on fonts. The red circles below show examples of serifs contained in New Roman Times Font. "San" means none. San serifs contain no arches and ends. Arial Font is a good example to use. When you choose a font, pay attention how legible is your font is on your name/message. Tracking and kerning are terms used to describe the space between each letter. Sometimes you may need to adjust spacing from letter to letter and using these adjustments may make you keep a font selection.
Designing your logo will require trial and error but there ways to help you develop a strong logo. Start your design without color. (black, white and very few shades of gray) Strong design is shape and silhouette oriented. Color is to enhance your logo so add that at the end. When you design a logo make sure to use the least amount of strokes, marks and shapes to make up your logo. A good design can always hold on its own. |
Author Welcome to my blog. I'll be sharing my thoughts and experiences as an artist and a scholar of the arts. Archives
September 2013
Categories
All
|